If you searched Google for “How To Upload a SCORM Package to an LMS”, you’ve come to the right place.
This guide walks through every step required to upload and launch a SCORM package across the most common Learning Management Systems.
If your business is working with a digital training provider like us, you will typically receive a SCORM package to upload to your LMS. This is a .zip file that contains your full e-learning course or 3D web simulation, designed to be uploaded into your LMS so it can be accessed, tracked, and reported on. Unlike normal files, this isn’t a file you open directly on your computer. It must be uploaded into an LMS to function correctly.
Whether your SCORM package is a standard eLearning module or a more advanced interactive unity simulation, the process of uploading it follows a similar structure, but there are some small differences in each LMS can cause confusion or errors if not done correctly.
Keep reading to follow step by step instructions for each platform, along with common issues and how to resolve them.
Before You Start (Applies to All LMS Platforms)
Before beginning the process of uploading SCORM files to the LMS, make sure to check these first:
File ends in .zip
Check file size limits for your LMS (Unity simulations can be large)
You have permission to edit courses or add content in your LMS.
What You’ve Been Given by Your Training Provider
A .zip file containing the full training course or simulation
The package will be exported in a specific SCORM version (1.2 or 2004). Confirm this with your provider so it matches your LMS requirements
Do not unzip the file—it must be uploaded as-is
SCORM packages can be either:
Standard eLearning modules – slide-based courses with quizzes, videos, and text
Unity simulations (WebGL) – interactive 3D simulations requiring more system resources and proper LMS/browser configuration
Both types require an LMS or SCORM hosting service to function correctly.
Step by Step Process (Works Conceptually for Any LMS)
Every LMS follows the same structure, even if buttons are named differently:
Open your course
Add new content or activity
Choose SCORM or upload package
Upload the .zip file
Configure tracking settings
Save and test
Below are exact steps for the most common LMS platforms.
Platform-Specific Guides to Uploading SCORM Files to LMS
LMS Platform
SCORM Support
Supported Versions
Upload Steps
Moodle
Full
1.2 & 2004
Turn editing on → Add activity → SCORM package → Upload zip → Configure completion → Save and display
TalentLMS
Full
1.2 & 2004
Add content → SCORM → Upload zip → Configure completion → Save
Docebo
Full
1.2 & 2004
Courses → Training Material → Add Training Material→ SCORM → Upload → Configure tracking → Save
Litmos LMS
Partial
1.2 only (2004 limited)
Open course content area → Create → SCORM Package → Upload → Configure completion → Save
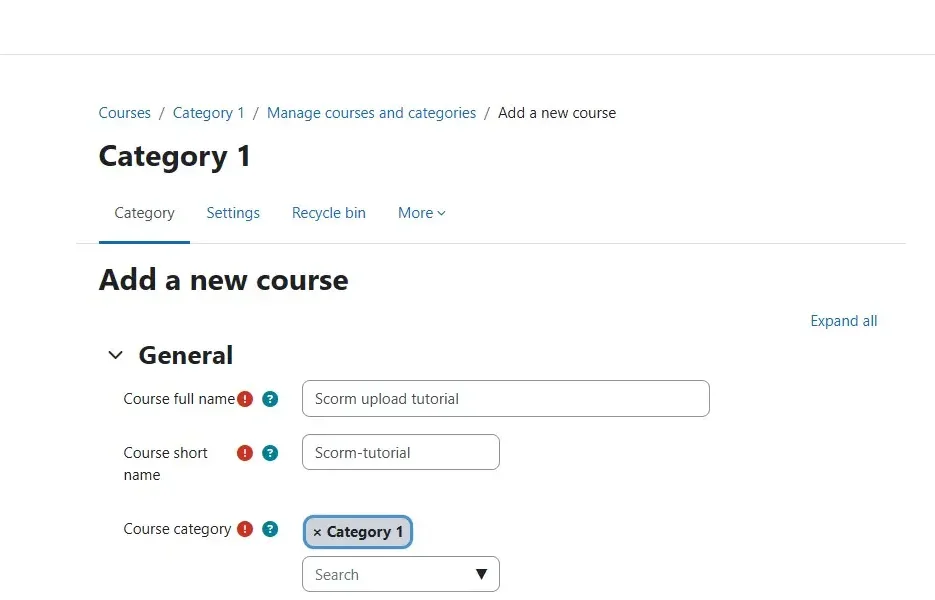
Give the course a name, and other required details → Scroll to bottom → Save
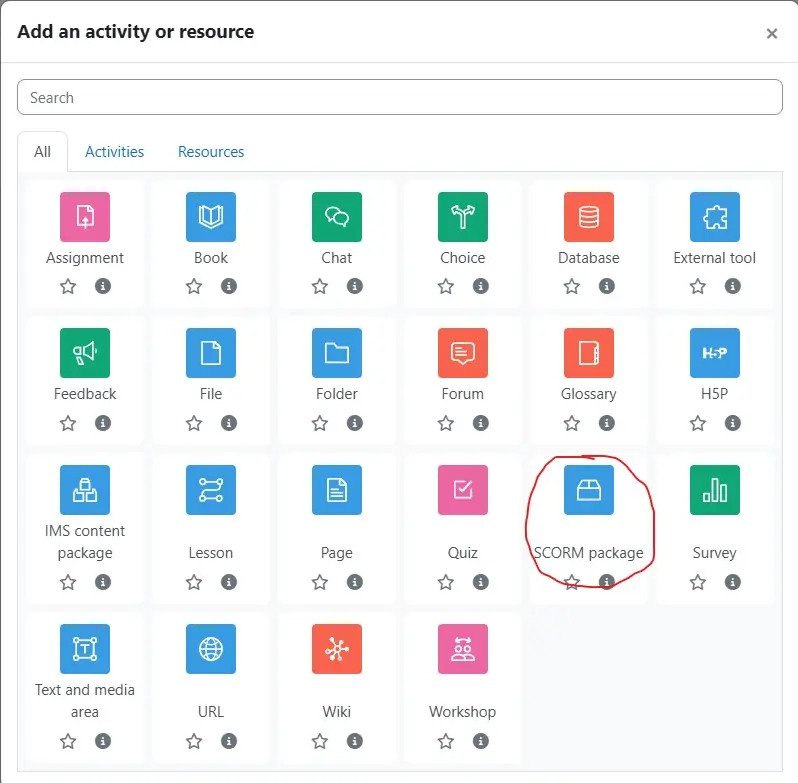
In your course → Click Add an activity or resource
Select SCORM package
Add a name → Under Package → Package file → Upload the .zip file
Configure settings
Click Save and display
The below guides all follow a similar process, these guides are verified using the guidance and information available from each LMS’s website directly.
Click Upload/Create → New SCORM Object/xAPI Object
Upload the .zip file
Configure options
Click Save
Troubleshooting (Applies to Any LMS)
1. File Won’t Upload
Ensure the file you upload is still a .zip, do not unzip/extract the file before uploading.
Do not unzip and rezip incorrectly
Check file size limits
If file size limits are your issue, Certain enterprise LMS (like Oracle LMS, Cornerstone OnDemand, Moodle with file access) allow admins to upload the SCORM package directly via server file system or FTP and then register it in the LMS. In these unique cases, you would be required to unpack the .zip file.
2. Course Won’t Launch
Disable popup blockers
Try another browser
Check LMS supports SCORM version (1.2 or 2004)
Unity3D Simulation: If you are running a Unity simulation and you get an error or loading that never ends, refer to these steps.
3. Progress Not Saving
Check completion settings in LMS
Ensure SCORM version matches LMS capability
Test with a different user account
Unity3D Simulation: If you are running a Unity simulation and your progress isn’t saving between sessions, this feature needs to be implemented by the ones that developed the simulation. It’s important to make it clear to your training provider that this feature is needed before development.
4. Blank Screen or Errors
Usually caused by:
Broken SCORM package
Missing files inside zip
Solution: request a new export from provider
Unity3D Simulation: If you are running a Unity simulation and you get an error, refer to these steps.
5. It Uploads but Doesn’t Track
Most common issue
Caused by mismatch between:
SCORM settings (authoring tool)
LMS tracking rules
Unity3D Simulation: If you are running a Unity simulation and you have this issue, refer to these steps.
Safari: Enable Develop menu → Option + Command + C
Save the console log:
Chrome / Edge: Right-click → Save as .txt
Firefox: Right-click → Export → .txt
Safari: Copy all text → save .txt
Send the log file to your training provider
Notes:
Large simulations may load slowly, give it a few minutes
If your LMS is on HTTP instead of HTTPS, make sure you’re SCORM package was designed for use in a HTTP environment. For Unity simulations packaged for SCORM, the files need to be configured uniquely to work with different systems. Make sure to inform your training provider of these details before buying training from them.
Thank you for using this guide, I hope it’s been able to help you. SHIIFT is a provider of blended training solutions including VR training, e-learning, or web-based 3d simulations that run directly from your LMS with SCORM.