Send us a message
We would like to learn more about your challenges and to understand how we can support you.
Get in touch.
Send us a message and we’ll get
back to you within 48 hours.
Alternatively, email
hello@shiifttraining.com
Virtual reality requires adequate space for safe and effective use. The amount of space needed varies depending on the user type, the VR hardware being used, and the intended application.
At SHIIFT, our clients and often ask us “How Much Space Do You Need For VR?” and questions about what it takes to build a VR training facility for their company and the different things they need to know, so this article breaks down space requirements for businesses, education facilities or even gamers, to space out their ‘VR Stations’.
This guide will also help with differentiating between standalone tracking systems and SteamVR/HTC base station tracking and concludes with a detailed section dedicated to businesses aiming to create a VR training facility or universities that need to understand the logistics of bulk usage of VR headsets on their campus.
These terms are all simply referring to how you use the headset, roomscale means to use all the space in your room or at least a large amount where you can walk around physically, while standing VR and seated VR are based on staying in a central location with less physical movement.
Roomscale VR – Needs some space to walk around

Standing VR – Needs enough space to pivot and have both arms fully stretched
Seated VR – Needs enough space to turn head and have both arms fully stretched
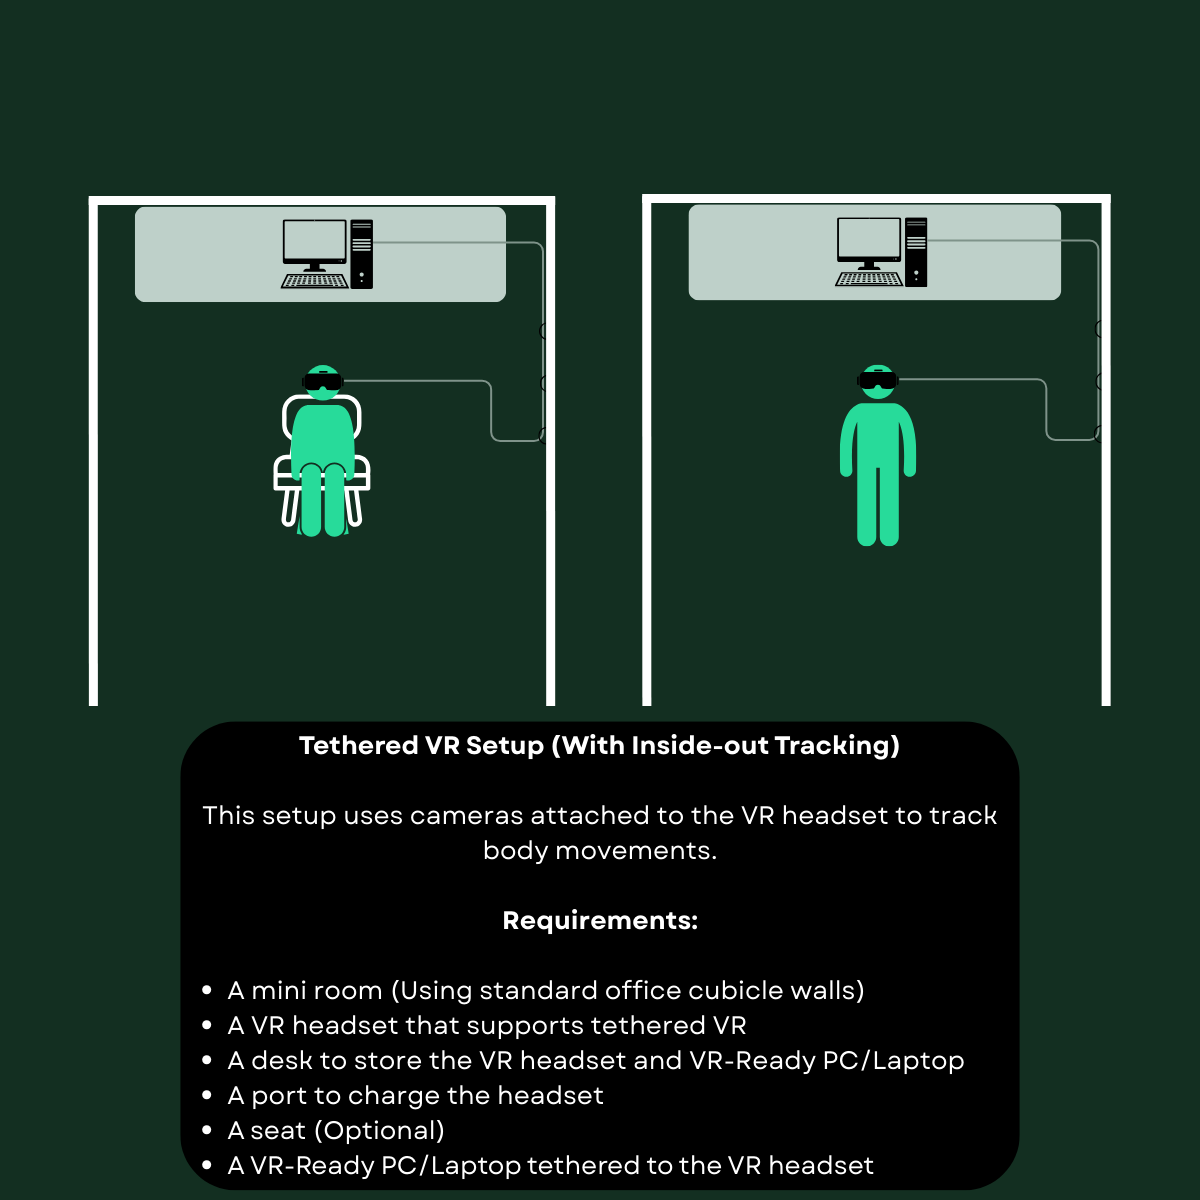
Standalone headsets, like the Meta Quest series, use inside-out tracking, relying on cameras installed in the headset rather than external sensors. This setup offers flexibility and requires less dedicated space.
Nowadays standalone headsets will often have a PCVR option where you can tether the headset to a PC to access a larger library of VR content, and draw power from the PC for higher visual fidelity, but they only need a detachable USB-C cable and don’t need base stations.
 Inside-out tracking with PCVR | 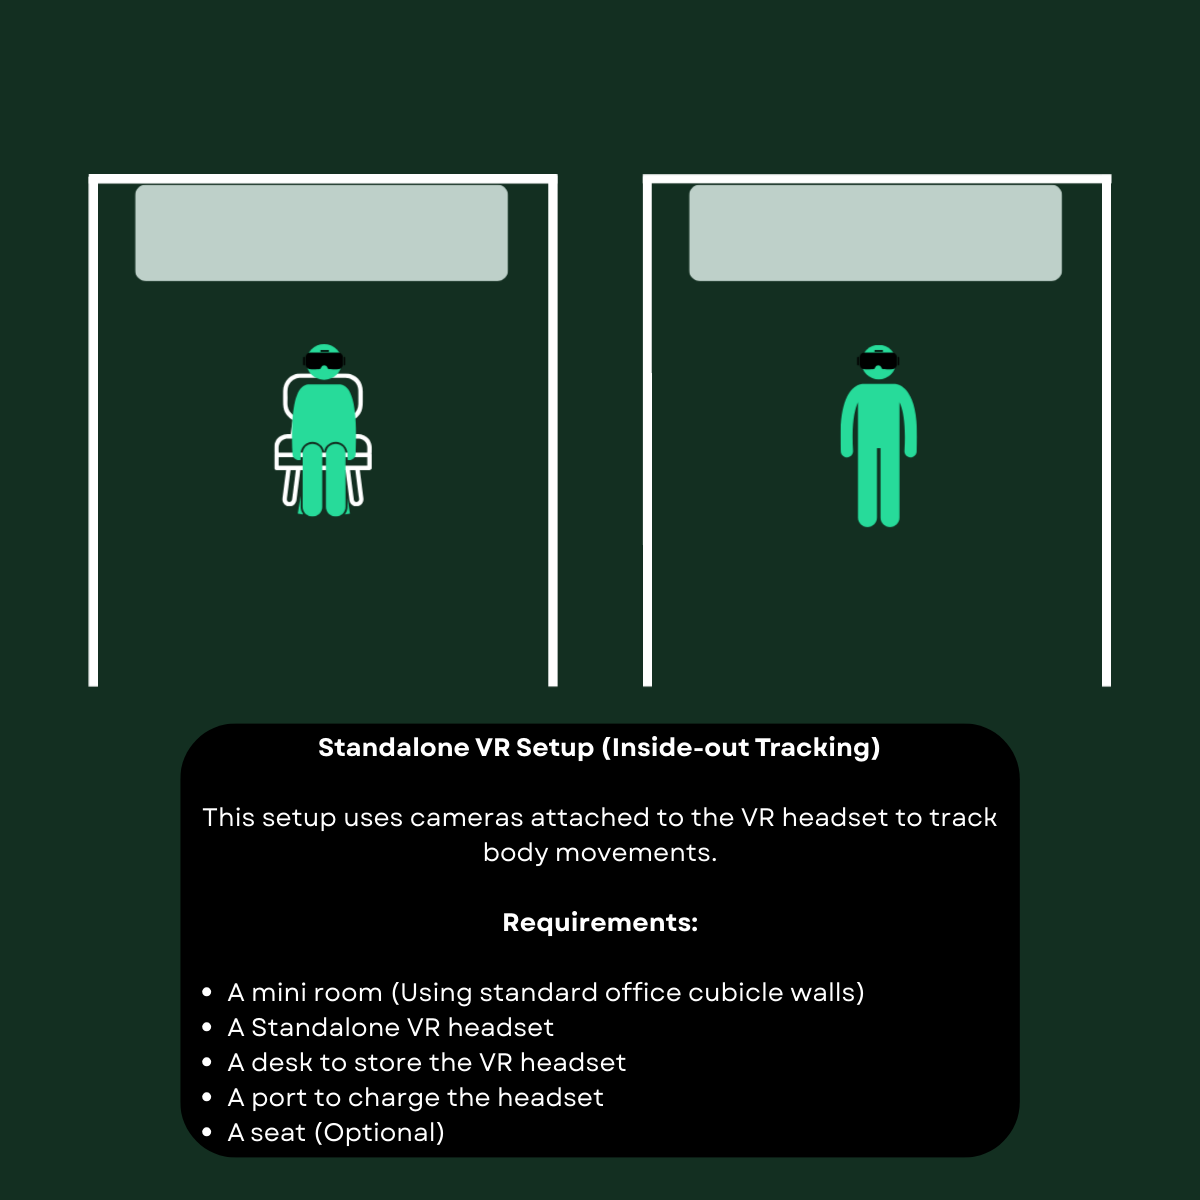 Inside-out tracking standalone VR |
This tracking system uses external base stations, (also referred to as lighthouses) placed in the room’s corners to track headset and controller movement precisely.
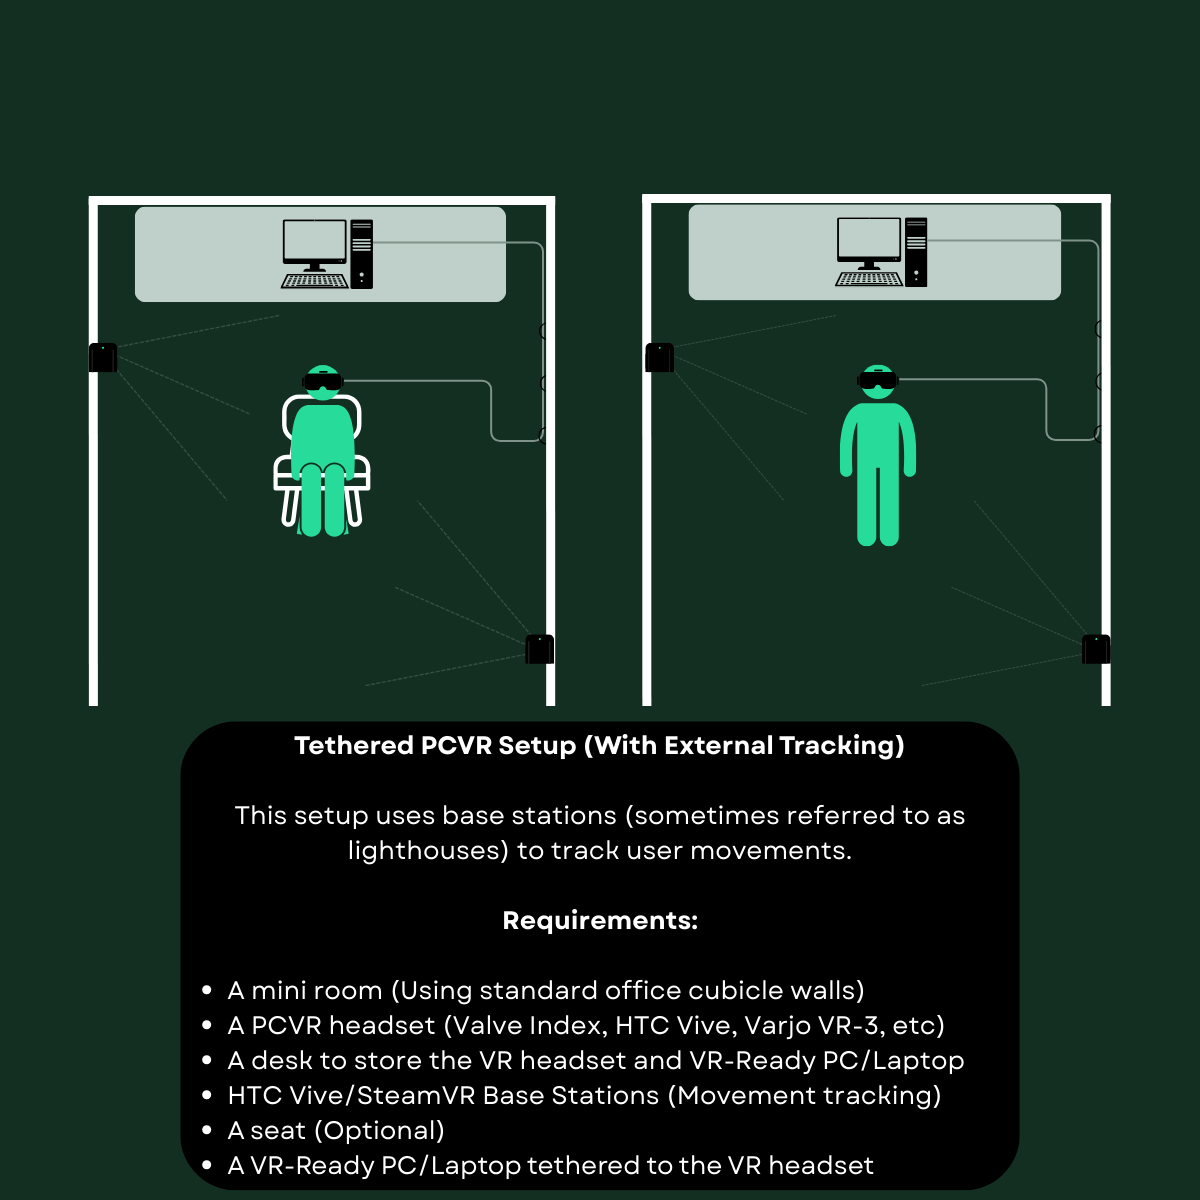
Tracking with Base Stations
Tracking Accuracy: Base station systems generally provide higher precision, beneficial for detailed or complex tasks, but at the cost of more required space and setup complexity, as well as much higher hardware costs. Nowadays, this difference in precision will barely be noticed in most cases. The cases where it may be noticeable is if you have your hand/VR controller behind you, a standalone headset won’t be able to sense it since there are no cameras on the back, but if a base station is mounted to the wall or a tripod behind the user, this can be tracked.
This could matter in fringe cases where you might need to have the VR experience track your hands even in areas where you aren’t looking.
Installation: Standalone systems are plug-and-play, whereas base stations require mounting, calibration, and periodic maintenance.
If you’re a business implementing VR for training or simulations, you probably plan to implement your training in bulk which means you’ll be considering additional factors such as space required for multiple users, equipment storage, and workflow. The same goes for if you’re a university or educational institute needing dedicated spaces for your students to access the VR experiences they need, so the below guide should be suitable for you too.
Select a quiet, well-lit room with minimal trip hazards and enough space to move freely. Even if the VR training only requires seated use, adequate clearance around each station improves safety and reduces the risk of collisions.
Ideally, an empty room or warehouse building can be dedicated to VR training to maximize efficiency for a dedicated VR training area.
Businesses should plan for the number of trainees who will be using the system at the same time. The number of stations depends on how many people need to train at the same time. A single station is fine for low-frequency use, but higher training volumes benefit from multiple stations running in parallel.
During training, it’s possible that an instructor will need to be present, to give their instructions or constructive feedback to users while they go through a VR training course. In this situation, it would be ideal for the instructor to see what the user sees, here are the different ways to make that happen:
1. Oculus / Meta Cast
Meta headsets, including Quest 2 and Quest 3, include a built-in casting feature. Trainees can cast their view to a smartphone, tablet, or compatible smart TV on the same Wi-Fi network. This method is straightforward to set up and does not require additional hardware. It’s ideal for small training rooms or single-station setups. The main limitation is that the casting quality depends on the Wi-Fi network, and some latency may be noticeable, particularly in large spaces.
2. Oculus / Meta Link (USB Link Cable)
For PC VR applications, the Meta Quest headset can connect to a VR-ready computer. Once connected, the headset’s view will be mirrored to the PC and displayed on a monitor or projector for the instructor. This method provides higher fidelity than standard casting and supports more graphically demanding applications. Wired setups require proper cable management to avoid hazards, while wireless setups require a strong local network to minimize lag.
3. SteamVR Mirror / Windows Mixed Reality
Most PC-based VR headsets, including Valve Index, HTC Vive, and Windows Mixed Reality devices, include a mirror mode. This outputs the headset’s real-time view to a connected monitor or projector. Mirror mode is simple and effective for observing multiple trainees in a room, supporting almost all PC VR content. Latency is generally low, though not zero, and the display must be close to the training area to maintain clear visibility.
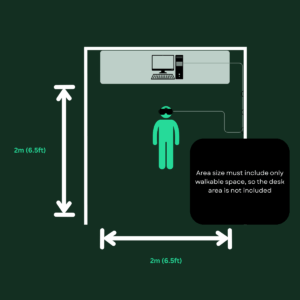
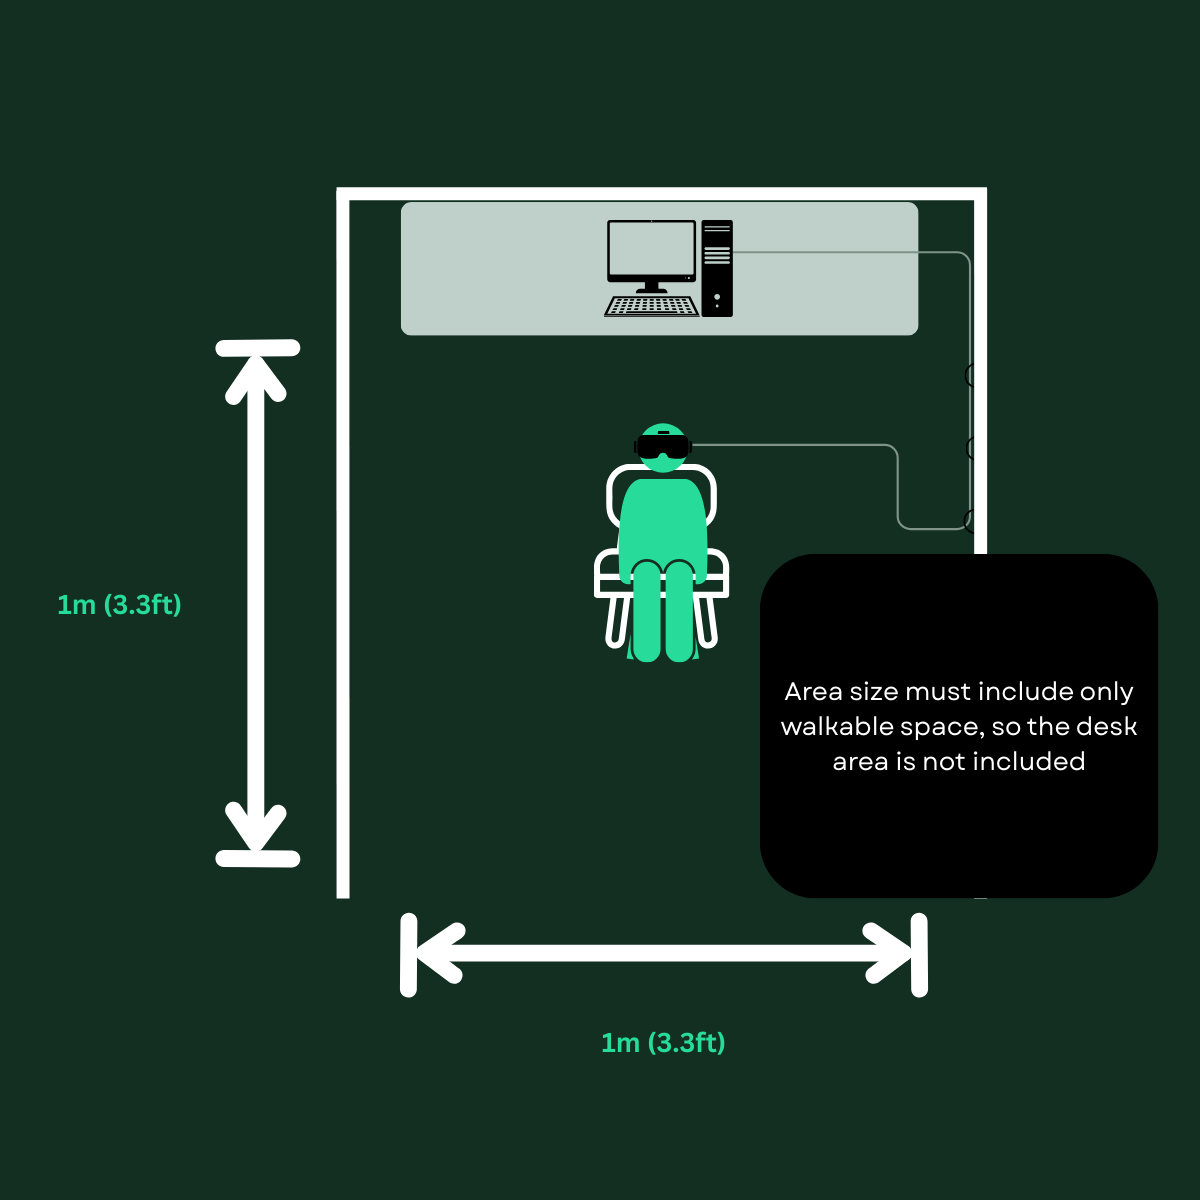
Decide how much space you plan to use for the VR, as a reminder if you have minimal movement 3.3 ft by 3.3 ft (1m²) should be fine, other wise go for 6.5 ft by 6.5 ft (2m²) or above. You can use the existing walls in your building to reduce costs on the wall dividers for separating each VR station.
After deciding how much space you want for the users to be able to walk around or move in, you need to account for the extras like the desk or any storage for the VR headset, since you’d likely want each VR headset to be stored at each station with it’s charger, and it’s dedicated PC or base stations if you use them.
Rubber mats can increase safety so that users can feel the ground under them to differentiate it from the non-vr space like the exiting area. This also helps soften any falls on the rare occasion someone trips over a wire, but this should be resolved by using cable ties to keep the cables away from the ground and on the walls or ceiling instead.
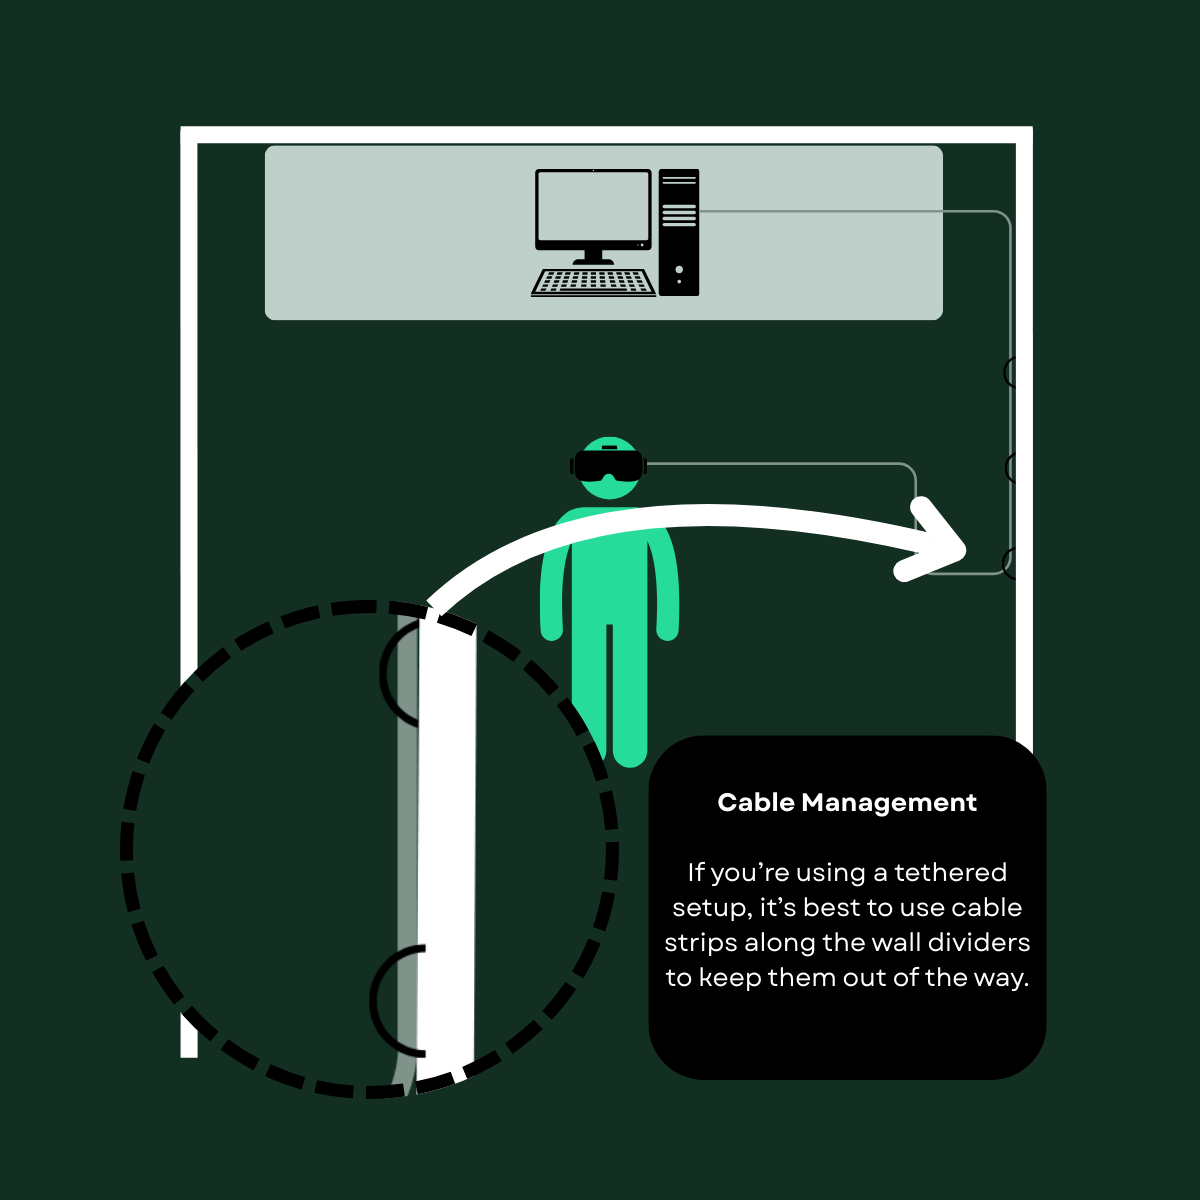
VR Station Cable Management
Make sure to install the VR training builds onto each VR headset.
Also, for each VR headset, you will want to have it’s ‘boundary’ set up in the correct location. Each VR headset will remember the boundary, which is the zone the VR headset will be used in so that if a user is wearing the headset and walks out of the zone, they will receive a visual indicator showing them they are nearing the edge of their allocated area so they don’t walk into any furniture, pets, people or walls.
If you’re using a Meta Quest, use this guide for setting up your boundary on a Meta Quest VR headset or watch Meta’s video tutorial below.
If you’re on a PCVR dedicated headset, follow this video guide for setting up boundary in SteamVR which will work for HTC Vive, Valve Index or any other PCVR-only headset.
If you’re using PCVR, mount any external sensors if you’re using any, and set up the PC to be ready for VR-usage by installing the required software like Steam (and SteamVR) and/or the Meta Quest Link App, the VR training builds, and any other setup that might be necessary for your specific workplace policy.
In some cases if you’re using a gaming laptop, you might need to go through some extra steps to make sure your laptop is using the more powerful graphics card (GPU) option.
Follow these steps below to resolve this.
These instructions will work for laptops using an NVIDIA GPU, if your gaming laptop is using an AMD GPU you will need to follow the instructions from this guide for setting gaming laptops to use the dedicated GPU and set the setting to high performance separately for each application.
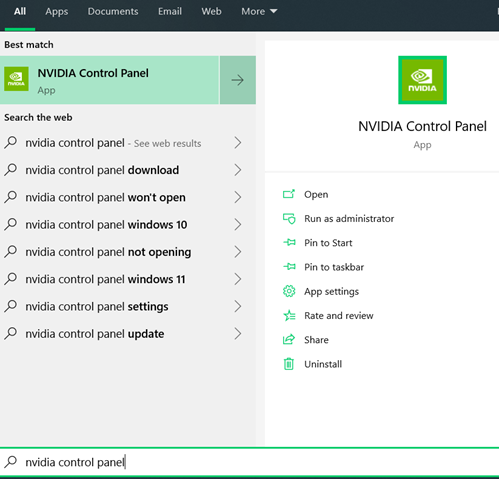
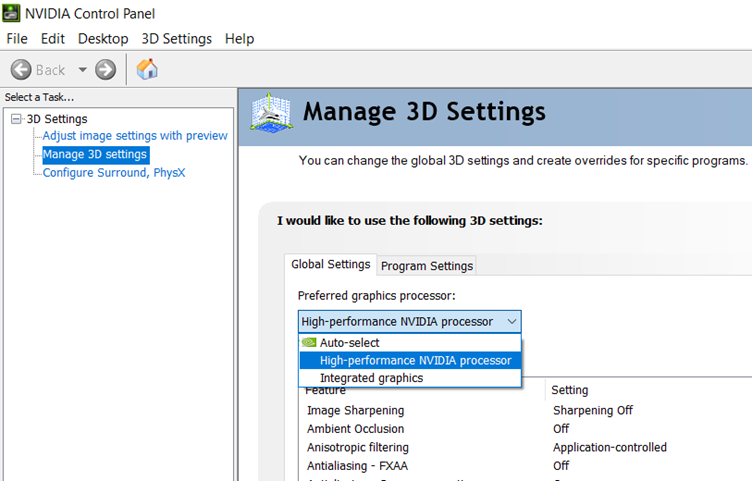
4.1. Open NVIDIA Control Panel
4.2. Agree to their terms if they haven’t been agreed to already.
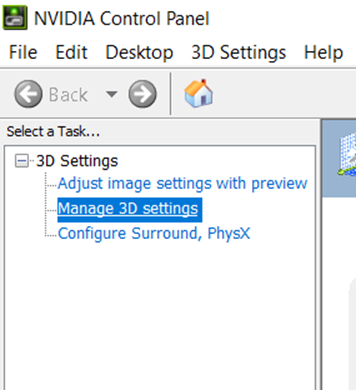
4.3. Select ‘Manage 3D settings’
4.4. Under the global settings tab, click on ‘Preferred graphics processor:’ and select ‘High-performance NVIDIA processor’.
5.5. Click on the ‘Apply’ button at the bottom right of the window.
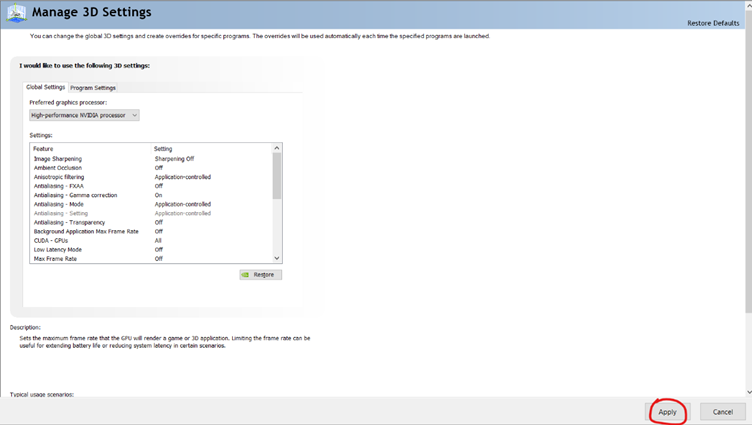
With that, your laptop should now be setup to always use the high-performance graphics processor. This means you can now use the gaming laptop to its actual potential and run the demanding applications that you can’t on a less powerful system. This will improve your laptop’s performance as well as use more power and drain the battery faster.
If you’re serious about your VR training facility, you’ll need it to be properly managed, especially if you’re expecting a lot of users often and have more employees that need to use the training then you have headsets or training spaces available.
Check out this comprehensive guide to help you figure out software and hardware costs of VR training. Since this guide focuses on training staff or students in bulk with a dedicated training facility, the below are some additional cost factors for that purpose.
Assuming you went the most cost-effective route for a VR training facility (Standalone meta quest headset with standalone VR software), your VR training stations might look like this. If you went a different route, these might have PCs, additional screens, cable management, etc.
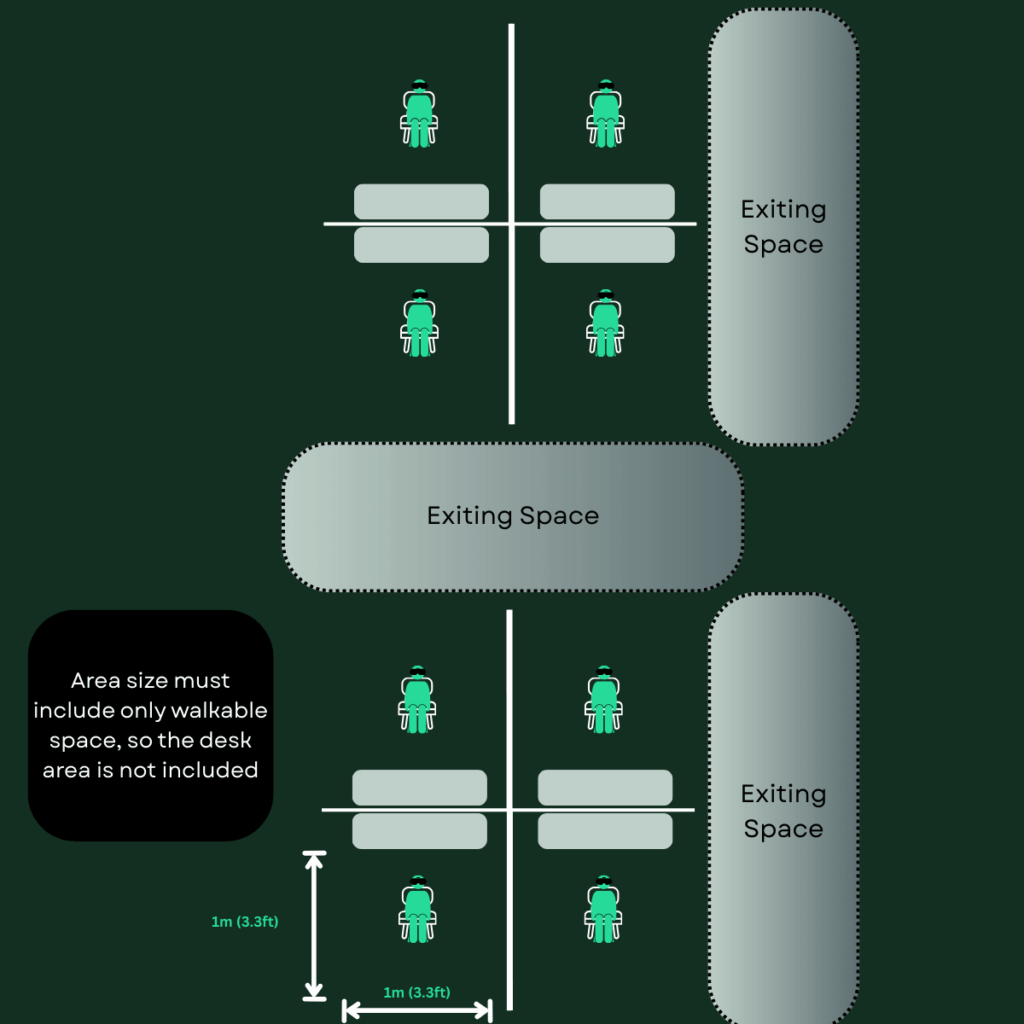
Multiple Allocated Spaces 2 by 2 Layout
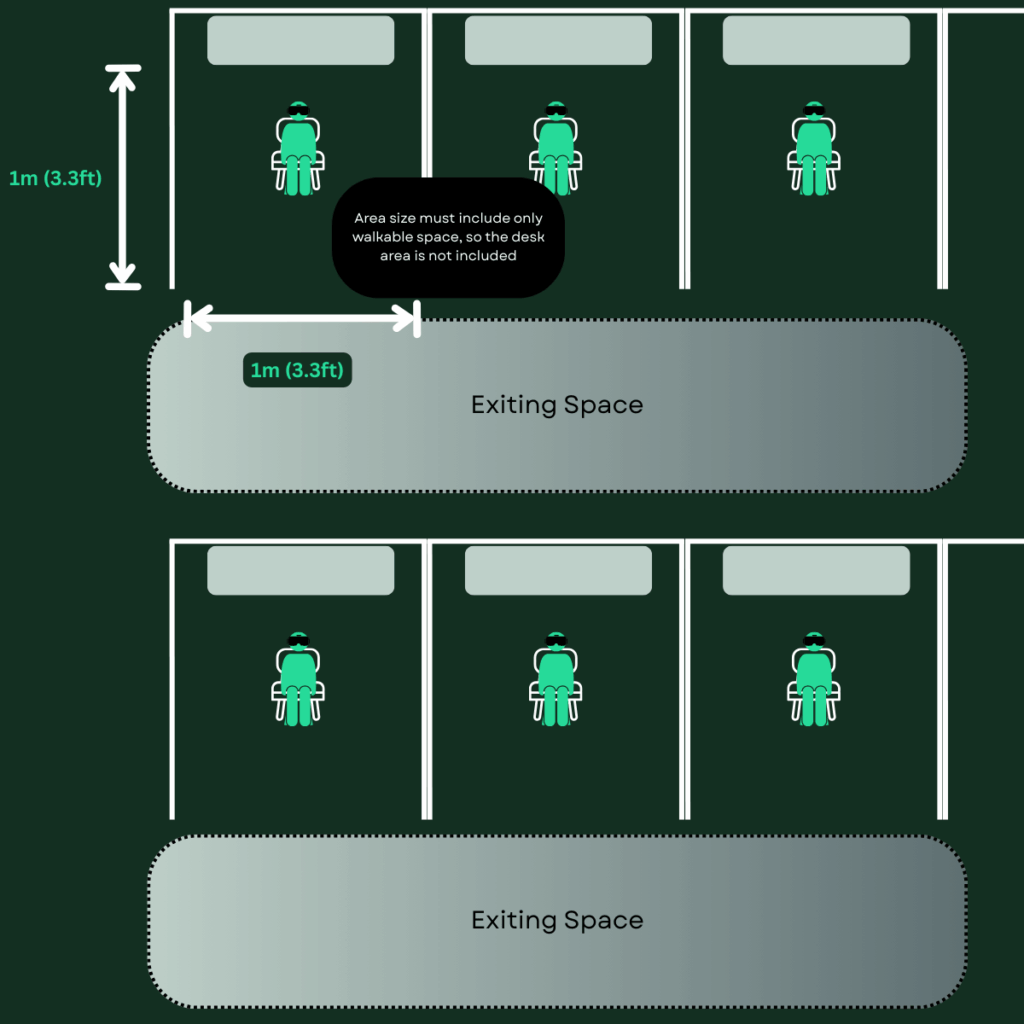
Multiple Allocated Spaces 1 by 3 Layout
So, how should you approach setting up a VR training facility for your company? First, think about how many stations you actually need and whether your sessions will be independent or always instructor-led. If multiple users will train at the same time, having clearly defined spaces with partitions or cubicles is essential.
If your team is using standalone headsets like the Meta Quest 3, you can get away with simpler cable management and fewer PC requirements, which makes scaling easier. Even so, ensure each station has proper floor markings, headset racks, and charging stations so everything is ready and organized for every session.
For setups that require PCVR, with tethered headsets and base stations, you’ll need more careful planning for cable routing and power outlets. SteamVR setups require precise base station placement, while keeping walkways clear and safe for users.
You also need to consider how instructors or supervisors interact with the space. Will they be observing on a display, walking between stations, or running multiple sessions simultaneously? Planning for displays, instructor workflow, and session management ensures your VR training remains smooth and efficient.
Overall, whether you’re going standalone or tethered, a properly prepared VR training facility makes a big difference. The key is balancing space, safety, equipment management, and technical setup so your trainees can focus entirely on learning without distractions. When you get it right, VR training becomes not only immersive and effective but also easy to run day after day.
A well-planned VR training facility creates a safe, efficient, and effective environment for immersive learning. By carefully allocating space, organizing equipment, managing cables, and considering user comfort, companies can ensure consistent results and protect both trainees and hardware.
Thoughtful layout and preparation also make it easier to scale training, accommodate multiple users, and maintain equipment over time. Investing in proper VR station setup ultimately maximizes the benefits of VR training while minimizing risks and disruptions.
I hope this guide has helped you! If you have any more questions, feel free to contact us using the ‘Send a Message’ button below.
Deliver next generation training. Get in touch.
Email us at hello@shiifttraining.com or send
us a message and we’ll be in touch within 48hrs.